Should I clean my milling tools?
In order for a tool to work at its peak efficiency, it needs to be clean. This is because as the tool cuts it makes a small chunk of material each time it spins around. When that chunk of material gets cut, it needs to get out of the way. There’s a short channel behind the cutting edge that gives the material a path to flow away. If you have too much build-up of material behind the cutting edge, it will keep the tool from moving material out effectively. Material build-up can cause the tool to re-cut material, which increases the wear rate of the tool and decreases the surface quality of the finished unit. Clean tools do run better.
How often should I clean them?

We recommend cleaning tools every 70-80 units and whenever you switch from one material to another. Some materials (i.e. high resin content wax and different brands of zirconia) will tend to stick to the tool more when milling. It’s important to remove that build-up to ensure the tool can perform properly.
How should I clean them?
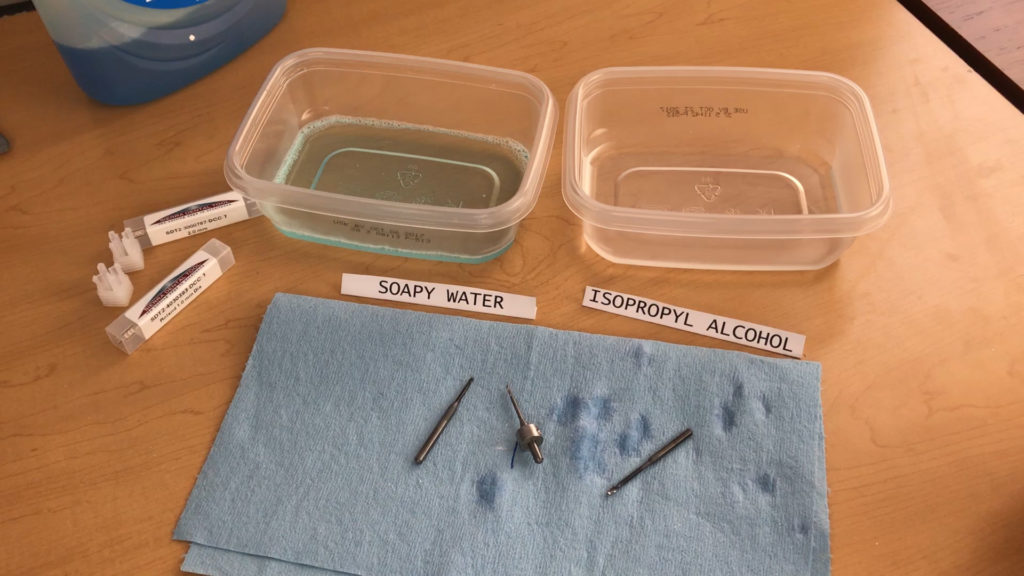
We recommend using soap and water between the fingers, followed by an alcohol dip, then dry. Check out the detailed procedure below:
IMPORTANT: Do not steam clean diamond coated burs. The fast change in temperature can cause a thermal shock. We know it’s tempting… don’t do it.
Here’s our recommended procedure for cleaning milling burs:
What you’ll need:
-Water
-Soap
-Isopropyl alcohol
-Dirty tools
Step 1: Apply a small amount of soap/water on the tool with your forefinger and thumb. Gently work the soap mix into the tool to release material build-up.
Note: Be mindful of the cutting edge of the tool. If you handle it wrong it could cut your skin.
Step 2: Rinse the soap from the tool then look at it. If there’s still any visible build-up on the tool, repeat step 1.
Step 3: Dip the flute end of the tool in Isopropyl alcohol. This will remove any other residue left by the soap.
Note: It’s important to do this step! Left-over soap residue may encourage the material to stick to the tool when milling.
Step 4: Place the tool on a paper towel to dry.
Note: It’s important for the tool to be 100% dry before using again. Any left-over moisture can make material stick to the tool and may corrode other parts of the machine.
Note: If you choose to use compressed air to dry the tool (not recommended), be very careful not to send it flying.
Step 5: Get milling!
Conclusion:
Keeping your tools clean is an easy way to extend the life of your tooling and get better results from your milling machine. Add it to your process today and you won’t be disappointed.