
Join Greg in this 30-minute webinar focusing on technical application and your lab’s ROI.
Category: Tool Knowledge

Tech Talk with Zahn: Part 2 “Ongoing conversation”
Greg Everette, Business Development, Sierra Dental Tool joins Andrew Kissin, Director of Marketing, Zahn Dental to discuss: – How diamond-coated burs compare to other burs in the market, i.e using a process called CVD – Sierra Dental Tool’s education and support website, WeTeamUp – Working with Zahn Technical Support to troubleshoot users

“Growing the lab through burs” Join Greg and Nick on Voices from the Bench
“Greg Everett and Nick Alonge from Sierra Dental Tool come on the podcast with Elvis and Barbara to talk about these unsung heroes of our industry. Not only do they talk about how they can produce (or grow) a bur that is better than most average burs, but they also bring years of lab experience and a willingness to help when needed.”

Lab Media TV interviews WeTeamUp with Greg and Nick
Hezekiah Morales from LabMediaTV Interviews Greg Everett and Nick Alonge on what WeTeamUp Support looks like in today’s market.

Quality Milling Tools: A Deep Dive into your Foundation of your Digital Workflow
In this webinar, Greg Everett from Sierra Dental Tool takes a deep dive into the foundation of your digital workflow. Explore the role of milling tools in the modern dental lab, how they affect your production, and most importantly – your bottom line. He explains how industrial tooling theory applies to the dental lab, how to identify common milling issues, and then breaks down the importance of using quality tooling in the lab. If you’re milling in your lab, this webinar is a must.
Now available on demand! Greg Everett, Vice President of Operations, Sierra Dental Tool explores the role of milling…
Posted by Zahn Dental on Wednesday, May 13, 2020
Webinar: Digital Production in a Modern Lab
An efficient team runs on a chain of: digital production, correct tools and materials, maintained equipment, good communication, and time management. What does each of these mean for you? Check out the latest #webinar featuring Nick Alonge and Greg Everett as they discuss balancing cost and quality in a dental lab.

Zahn Tech Talk – A Short-Form Interview
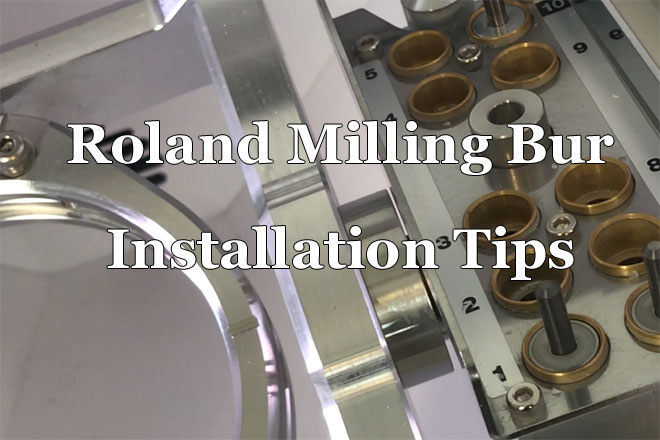
Roland Milling Bur Installation Tips
Goal: Avoid damage to the milling bur during installation
Loading burs into your machine is when you’re most likely to damage them. In this post, we’ll look at a few things you can do to avoid accidental damage to your Roland milling bur.
Many lab techs don’t know that the tip of a bur is delicate
The tungsten carbide that burs are made from is a very tough material. However, the shape of the material at the edge makes it susceptible to damage. The right impact can cause small defects in the cutting edge of your milling bur. These defects will drastically shorten the life of your bur. If you want to go in depth on that check out our post here: “Damaging Milling Burs: For Science!”
Roland milling bur install tips:
These tips apply to Roland DWX-50, DWX-51d, and DWX-52dc
- Be careful of the tip of the bur
It’s good to be generally mindful of where the tip of the bur is at all times. It’s easy to hit it on a variety of surfaces if you’re not aware of it. All it takes is one hit at the right angle to chip your bur.
- Load the collar shank first
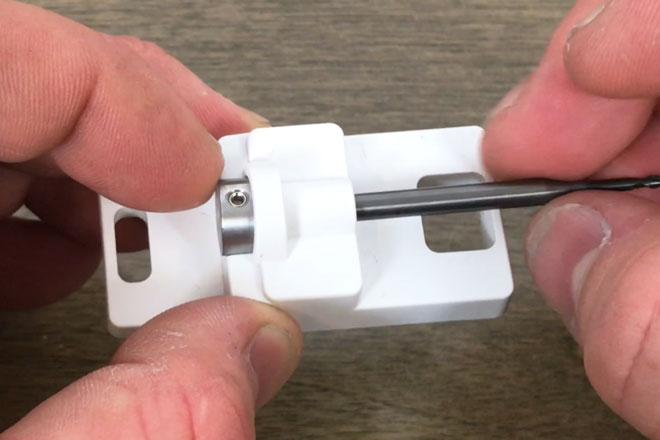
When you are attaching the metal collar to the bur, always make sure you insert the bur shank (machine side) first. This way you avoid dragging the cutting edge of the bur across the metal collar
3. Gently lower the bur into the holder
Once the bur is ready to insert into the machine’s holder, make sure that you center it in the holder before you push down. If it’s off center, it can hit the side or floor of the holder and damage the tip. Once it’s inserted, double check that it’s seated straight.
Conclusion
If you follow these simple tips when loading new Roland milling burs, you can reduce the chances of any damage happening to the bur. This is added insurance against early bur wear.

Damaging Milling Burs: For Science!
Damaged CAD/CAM milling burs will have a shortened life.
As a dental lab invested in digital technology, you want to get the most from your milling burs. Let’s take a look at what it takes to cause notable damage and how to avoid it. We’ll shed some light on the ways milling burs can get damaged and document the scope of that damage in each scenario.
It doesn’t take much damage to affect the lifespan of a milling bur.
The smallest defect in the bur’s cutting edge will become bigger as the bur wears. Any chip, divot, or abrasion in the bur will become a site for wear to propagate from. A damaged milling bur will work just fine for a little while, but it will certainly not last as long as a pristine one.
Accidents happen, so what’s the scope of the damage?
So, you dropped your bur… It’s probably fine, right? Unfortunately, there’s a good chance it sustained at least some damage. It all depends on how and what it hit. But how can you tell? To show you, I’m going to systematically destroy some milling burs and document the results.
How do burs get damaged in the dental lab?
I thought about the most likely ways for milling burs to get damaged in the lab. Here are a few that I came up with:
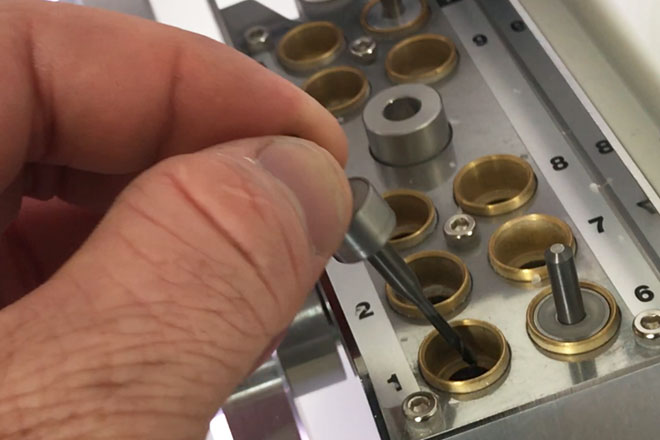
- Hitting a brass bur holder: It’s surprisingly easy to ding a bur when you install it in your milling machine.
- Hitting other burs: Are your burs rolling around in a drawer?
- Hitting the floor: Hard floors are not a bur’s friend.
How does each one of these affect the bur?
The only way to find out is to test it. I’ve designed a test to see how milling burs hold up to impacts with different materials. It’ll be interesting to find out how much abuse a bur can take before it’s got any visible damage. I’m going to do some controlled impacts of burs into various materials and show you what happens.
The Test:
The idea is to simulate an impact between a bur and these materials: brass, tungsten carbide, and tile – Then I’ll record what happens.
Building the Test Rig:
I needed to assure that the impacts to each material use the same force. After a little bit of research, I decided the best way to do that without fancy lab equipment was to build a simple pendulum. Using the same release point for the pendulum assures a reasonably accurate repeated force.
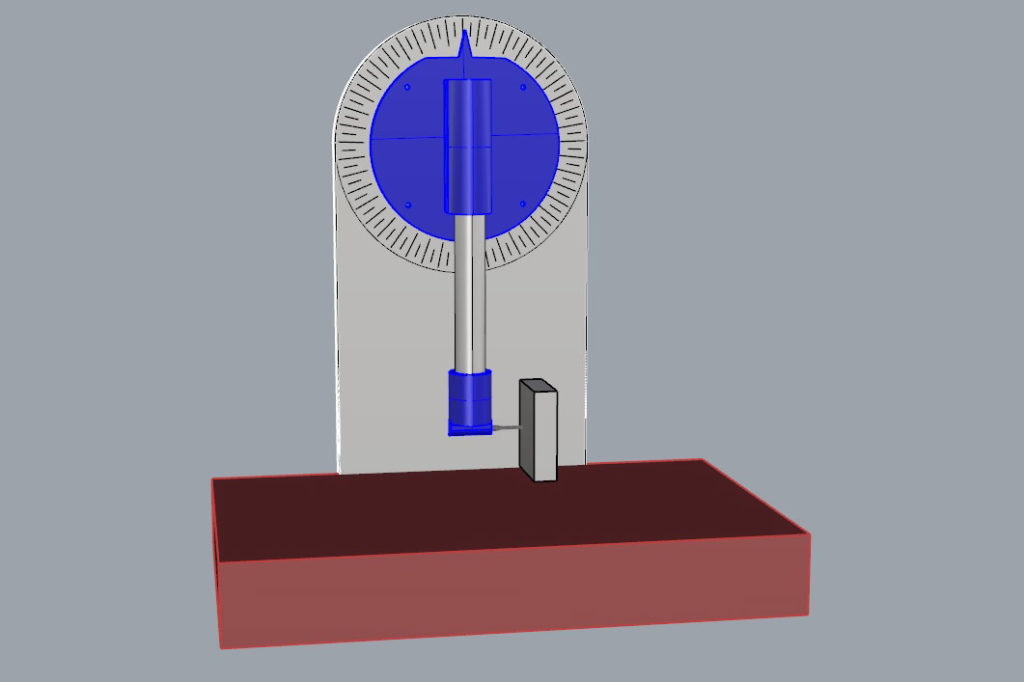
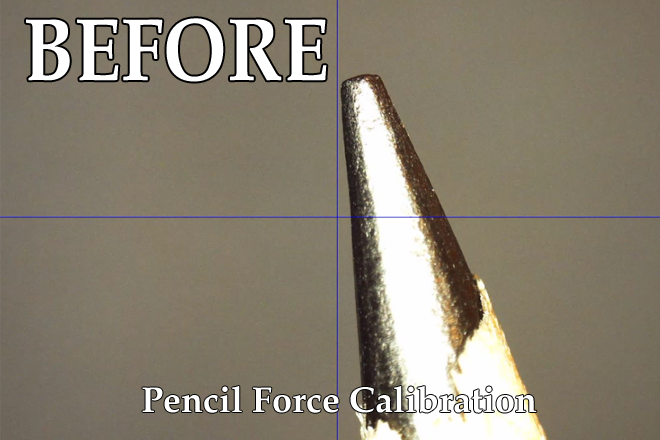
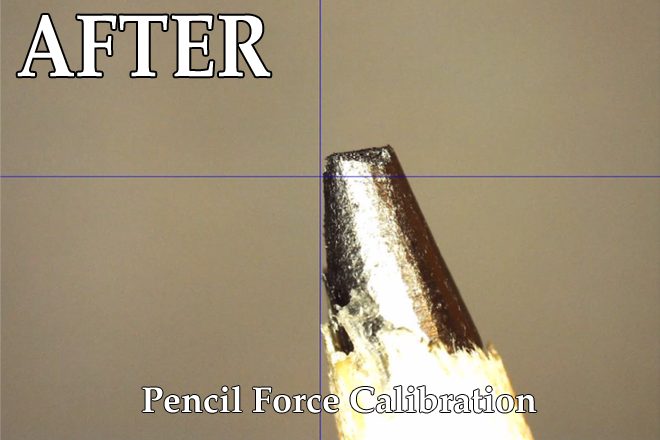
Calibration:
The right amount of force is key. After much consideration, I decided to keep it simple. As a benchmark, I would use the force required to chip the lead on a freshly sharpened number two pencil. I chose this because it’s easy to visualize and it’s repeatable.
I tested the pendulum rig with a pencil until the force chipped the tip. Then, I noted the mark that corresponds to that force. That mark is used as the drop point for all of the tests.
Results:
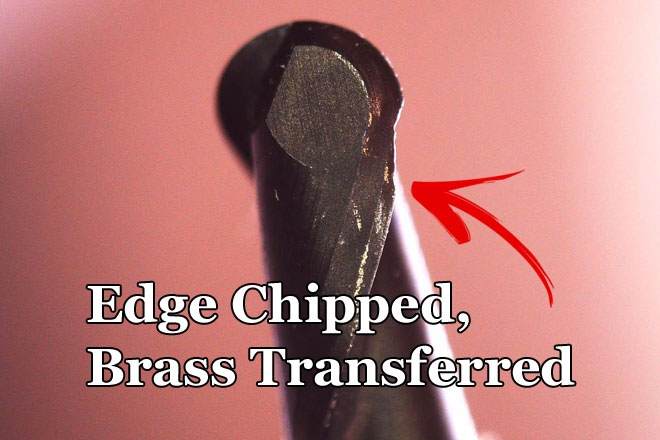
Test# 1: Bur hitting a brass holder
This one is designed to illustrate the impact between a bur and the brass holder in the mill. It’s easy to press the bur into the holder at the wrong angle or with too much force. It’s important to be diligent with your bur installations. Check out our post HERE for more on that.
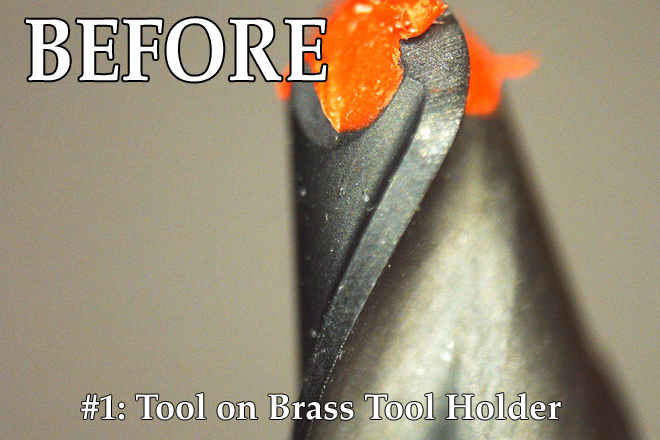
Notice the significant amount of edge damage. Not only is the diamond coating chipped, so is the carbide. This is a fairly predictable result for a carbide on brass impact. This will surely affect the longevity of the bur.
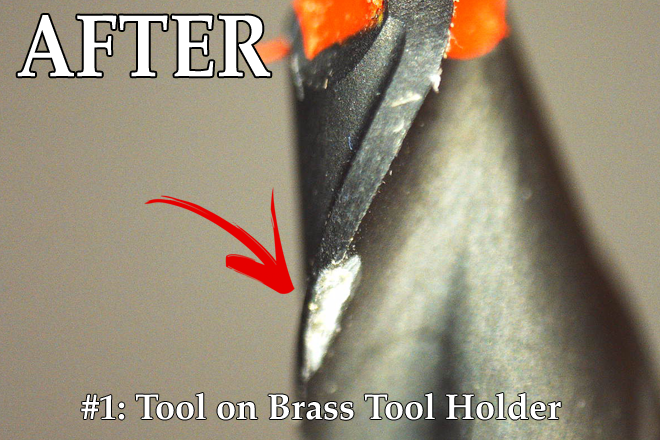
Test# 2: Bur hitting another bur
This impact simulates a scenario where a bur hits another bur. This is most likely to happen if you store your milling burs lose in a drawer. We always recommend storing your burs in the original packaging or specialized bur holder. Check out our post on recommended bur care HERE

This impact didn’t seem to dent the carbide very badly, but the diamond coating has certainly flaked off. Without the protection of the diamond coating in that area, this bur will surely suffer from a reduced lifespan.
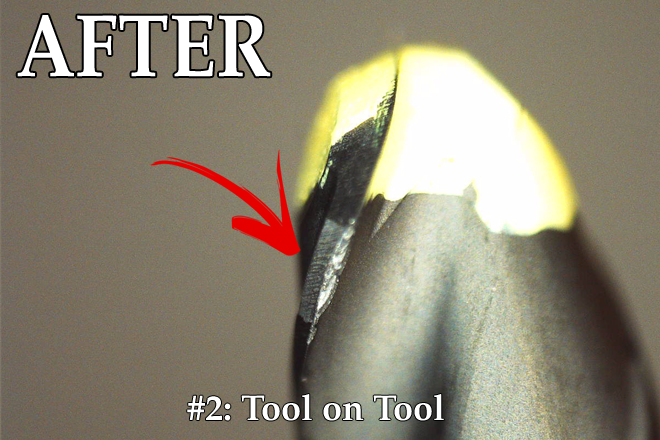
Test #3: Bur hitting the floor
Here we’re testing an impact with the floor. We’re hitting a bur into a small piece of floor tile. The hardness characteristics of tile are much different than metal. Note: This may not be a perfect simulation of a floor drop because a tip impact from standing height would likely have a larger amount of force involved. However, in the interest of keeping the test fair, I’ve kept the force the same.
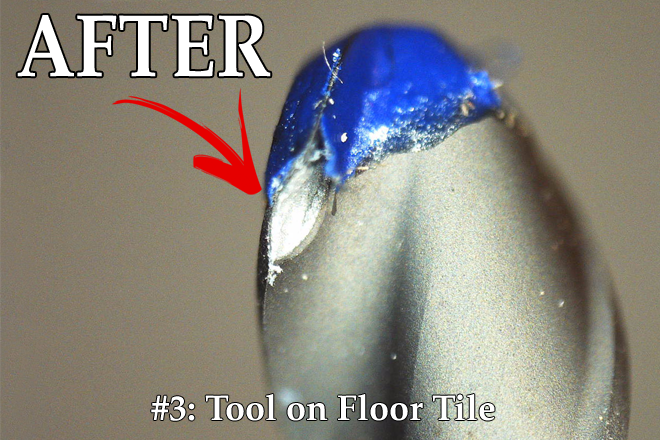
This is by far the most interesting result. I expected somewhere between the carbide and brass tests. However, it appears to be at or greater than the damage caused by the carbide impact. This is definitely a reason to avoid letting your burs hit the floor!
Conclusion:
After running this test, it’s clear to me that any impact with a bur is not good. This is definitely something to keep in mind when you’re working with milling burs in your lab. If you do your best to care for your burs, you’ll insure you get the most bang for your buck.
Top Ten Tool Life Tips

When you purchase tools for your mill you want to make sure you get the most out of them. Many labs out there don’t realize how many different things that can impact the life they get from their tools. There are numerous contributing factors to tool longevity. We wanted to identify and explain a few of them.
In no particular order, here is our top ten list:
1. Machine Maintenance
The easiest thing you can do to help your tool life is to be diligent with your machine maintenance. A well-maintained machine is going to subject the tool to the loads that it’s designed to take. Usually, manufacturers have recommended intervals. It’s important to keep up with the scheduled maintenance of the machine if you want to protect your investment. It might be a pain to shut down for a little while, but it’s much better to catch a problem beforehand instead of experiencing a breakdown.
2. Machine Calibration
Calibrating your machine ensures that it carries out commands made by the CAM software in the most precise way possible. A machine that is not calibrated may make erroneous movements. This has a big effect on tool life. It’s comparable to driving a car that has bad alignment. If your alignment is off your tires will wear prematurely. We usually find that labs don’t calibrate enough. Our default recommendation is to do what your manufacturer says to do, but we offer a couple of added layers:
- If you don’t run your mill much, you still need to calibrate it. The daily temperature variances can affect the calibration of the mill.
- If you are running the mill in a high production scenario, you want to calibrate more often than the manufacturer recommends.
Properly calibrated machines run better overall and help you get the most life from your tools. You really can’t overdo it.
3. CAM Software and Milling Strategies.
If you think of your machine system like a nervous system, the software would be the brain. The CAM software deploys the milling strategy to tell the machine how to cut. It has a direct effect on tool wear depending on how aggressive the settings are, and if they are properly matched to the material you are cutting. Typically, when we find an issue with software it’s either out of date or not the right strategy for the material. Every software company out there is constantly tweaking their products to work best. We recommend staying current on your licensing so you can take advantage of the latest improvements.
4. Ambient Temperature
Air temperature can affect tool life because it can affect the calibration of your mill. If the air temperature changes significantly the mill can change shape due to thermal expansion of its frame. As little as 10 degrees Fahrenheit can have an effect on the calibration of your mill
6. Ambient Humidity
The amount of humidity in your lab can affect your tool life. The higher the humidity, the more material tends to stick to the tool while it mills. Clogged tools run hot and do not efficiently remove material from the cutting area. This increases the load on the tool and reduces the tools service life. It’s always best to keep your mill in a nice, climate-controlled area.
6. Mill cleanliness
Production environments are hard on equipment. Taking care of your mill’s hygiene will help you maintain its peak performance. If the mill is happy and clean, the tool will be too. In our experience, mills that are kept dirty are usually not maintained and calibrated regularly. Large amounts of material build-up inside your mill will increase the stress on its mechanics and spindle. This stress will trickle down to the tool, decreasing its life.
7. Material Evacuation: Air and Suction
Removal of powder from the workpiece is critical to the longevity of tooling. Milling in a pocket full of previously milled material can reduce tool life by 25-40%, depending on how often this condition exists. Check your airflow and dust collection. If you are getting milled material buildup adjust airflow accordingly to remove this condition. Most machine manufacturers have a recommended spec for both PSI and CFM; it’s an easy thing to double check.
8. Material Selection
As our digital technology progresses, the variety of materials available is growing. The hardness of the material selected can have a huge effect on the performance of tooling. The harder the material, the shorter your tool life. You can judge hardness of a material by feel. If you’ve cut on multiple brands of zirconia in the green state by hand, you will notice that the feel of each zirconia will differ a bit. The machine notices too. This is something to keep in mind when you are choosing materials to mill in your lab.
9. Spindle Health
The spindle is the lifeblood of your mill. It has a finite life that is rated by the manufacturer – usually in run-time hours. As a spindle ages it will begin to wear out. The spindle bearings become less accurate. This increases the amount of runout (see our article on runout HERE) which can significantly reduce tool life. You can track the health of your spindle by seeing how far into the recommended hours you are. Also, worn spindles will usually tell you they’re worn. If you notice a sharp decline in tool life or an audible pitch change in the way the spindle sounds it might be going out. Make sure to work closely with your machine supplier to keep on top of your spindle health.
10. Collet Health
The collet is a very important part of the tooling recipe. It assures that the tool is held securely and on center to the spindle. It’s good to keep in mind that collets are wear items. They need to be maintained and periodically replaced. If it’s worn, dirty, or not adjusted properly it will not hold the tool right. This can lead to increased runout which will cause the tool to cut unevenly and wear prematurely. If you notice your mill is chipping margins or wearing tools faster than it usually does, changing your collet is always a good first line of defense.
Conclusion
We hope that this list has given you some insight into the causes of tool wear. This information ought to give you the resource you need to more effectively judge your tooling situation.
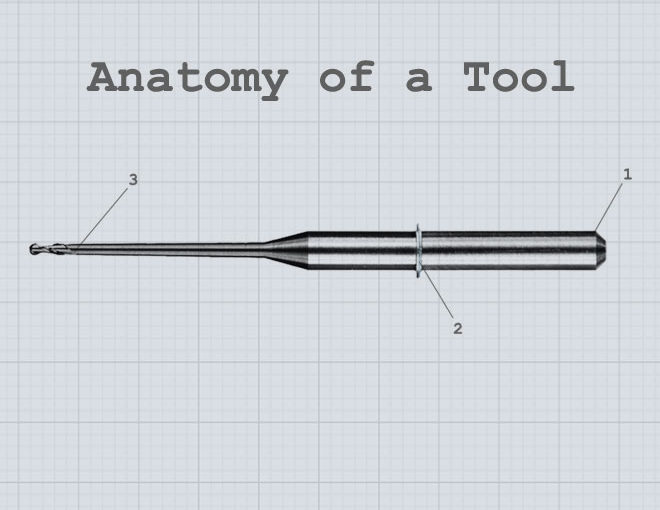
Anatomy of a Tool: Understand the Parts
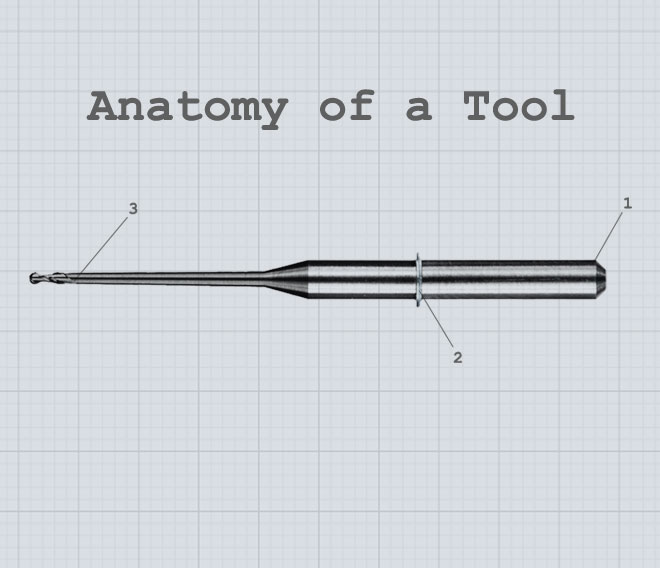
In this post, we’ll give you a top-down view of the parts of a tool.
If you know the basic parts of the tool and understand some of the design variables, you can understand what you’re buying and make your dollars go further.
Overall Length:
Measured end to end.
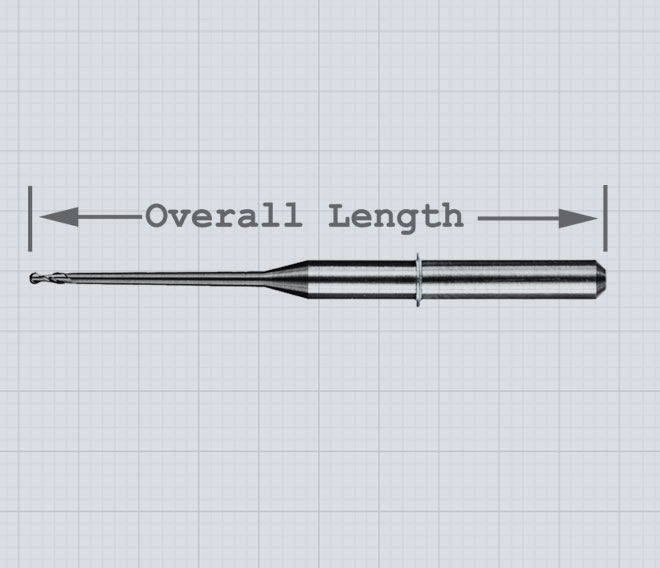
Nearly all of the dental CNC machines on the market today are designed around a very specific length of tool. All of the machining geometry is based on this dimension. It’s the foundation that the rest of your milling experience is built on. If the length is incorrect, trouble’s not far off.
Shank:
The thick part of the tool that is held in the spindle motor.
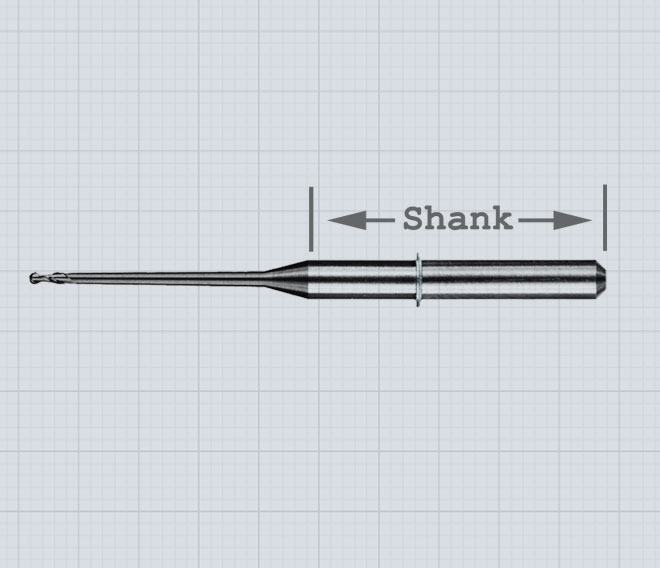
The quality of the shank determines how well it spins in the spindle. The finish tolerances set quality tooling apart from lesser tooling. Even the tiniest defect can cause an unbalance in the tool at speed. Liken it to the rim on a bicycle. If you’ve ever tried riding a bike with a bent rim you can visualize the importance of spinning a tool precisely. You should also know that some manufacturers don’t make their own tools from start to finish. It’s common practice to buy inexpensive pre-made blanks and grind a design into it. That’s a great way to save money, but the trade-off is the risk of making a slightly bent bike wheel. It’s better to control the production of the tool blank in-house. Make sure you ask your supplier how they source and tolerance their blanks.
Reach:
How deep the tool can mill.
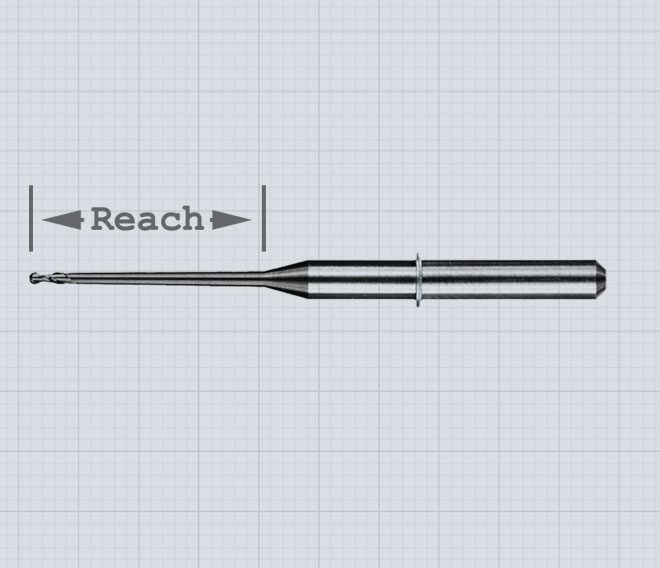
While it’s nice to be able to mill deep pucks, longer isn’t always better. Longer reach makes the tool more susceptible to bending forces. As length is increased the tool is more likely to vibrate and break when milling. Labs are milling more larger pucks today. When using long reach tools, it’s important to counteract these tendencies with good strategy design. Whenever you make a change in your tooling the milling strategy needs an update as well. The tool needs to be represented correctly for the CAM software to generate precise tool paths. It’s common for this mismatch to cause tool impacts and breakages. Make sure you work with your tool supplier to avoid this issue.
Flutes/Cutting Edge Design:
The business end of the tool.
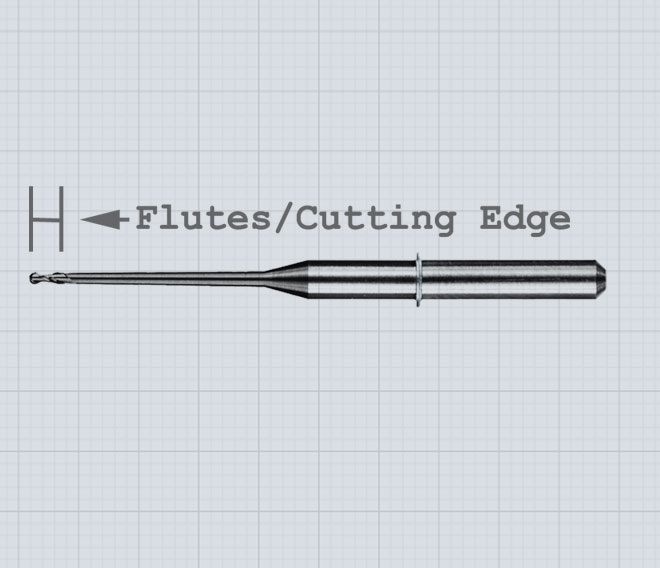
This part of the tool is directly responsible for the result you get from your mill. A good cutting surface will give you a good result, and vice versa. There are hundreds of different combinations of angles, profiles, and manufacturing processes that affect the performance of a tool in a given scenario.
If you look at the dental tooling market as a whole, you’ll find different schools of thought on how to design this part of the tool. On the low end, manufacturers can re-brand existing designs and sell them as dental tools. This practice is great for the profit margin on cheaper tools. Higher end manufacturers make the investment in good research and development. That gets you tools that are specially designed for the materials they are used in. A well-designed cutting geometry will give you much longer service life, and improved surface finishes on your units.
Conclusion:
We’ve seen out-of-spec tooling cause a wide variety of problems. It’s a drag on productivity. As a lab tech your time is more valuable at the bench than chasing down problems with your Cad/Cam equipment. Don’t let tooling be the weakest link in your process. Use a quality milling tool and reduce your overall stress level while improving your bottom line.

Runout: Is it Chipping Away at Your Productivity?

In this post, we’re going to outline what runout is and what you can do to avoid it.
Runout is one of the most significant sources of milling problems in the dental lab. If you have ever had abnormal tool wear or strange breakages you can’t explain, there’s a good chance you’re experiencing the effects of runout.
What is runout?
Basically, runout is the tendency for a tool to wobble as it spins. Any time that the tool spins around an axis that is not its center, it’s running out. It might not seem like that bad of a thing, but the forces that are in play when a tool is cutting need to be in precise balance. If they’re not, the results are anything but ideal.
How does it affect milling?
Efficient milling processes are all about balance. When a tool is running out, its performance will degrade drastically. The main reason is that runout creates uneven cutting loads on the tool. As a tool runs out, the chip load (amount of material the tool cuts) on the tool is constantly changing. This causes uneven cutting stresses and wears the tool unevenly. Excessive runout will cause more tool wear, more chipping of margins, and more trouble overall.
What are the common causes of runout?
In an ideal world, the tool would be in perfect alignment with the spindle axis at all times. However, this rarely happens in real life. There are many variables involved in how precisely a tool spins. Here are a few things you can check to help counteract the effects of runout:
- Collet health: The collet is responsible for centering the tool to the spindle. If it is worn or dirty it will easily cause runout. This alone is probably the largest contributor to runout related issues in the dental lab. All too often, the collet is ignored in the lab. It’s important to know that the collet is a wear item and does need to be serviced and replaced periodically. To avoid collet issues, make sure to follow the guidelines that came with your machine concerning collet maintenance.
- Tool quality: There are some low-quality tools on the market that aren’t made to the exacting standards that higher-end tools are. This results in a tool that can run out on its own. The ability to hold tight machining tolerances is the most important part of creating a quality tool. Just be aware: cheaper tools might have runout built right in.
- Spindle health: Unfortunately, spindles wear out. The bearings will wear and the spindle itself will start to runout. If the spindle is running out, so is the tool. Anyone who has run a milling machine for a significant amount of time will tell you that they’ve had to replace a spindle. It’s a huge headache, but if you’ve got a worn one you have to replace it.
- Milling strategy: Believe it or not, the strategy can cause runout too. The milling strategy tells the machine how to run the tool. It programs spindle speed, feed rate, depth of cut and other aspects of the milling process. If the strategy is not designed optimally, it can cause the tool to deflect (runout), and otherwise perform badly. In order to avoid this one, make sure you always have the most up to date milling strategy from your supplier.
How do you know if runout is your problem?
If you’re having milling issues there’s always a long list of potential causes. The best advice here is to work closely with your machine supplier and have them help you make the diagnosis. If you do have a runout problem, it’s likely you’ll go through several troubleshooting steps to get to it. This is because when troubleshooting a machine, the low hanging fruit is picked first. They’ll usually go through your software, calibrations, etc before attempting to diagnose a runout issue. Be aware that replacing tools or updating software may mask a runout issue short term, only for the problem to come back in short order.
If a runout condition is bad enough, it will show up in the tool wear pattern. Look at the tool under the microscope. If it has more wear on one side than the other, it’s very likely that it has been running out.
The sure way to see if you have a problem with runout is to measure it. Some machines have indirect ways of measuring runout, but the most reliable way is to use a dial indicator and measure it right at the tool. Usually, this is something that a service tech will do on a field call. Every machine has a runout tolerance that is considered acceptable. If it’s outside the acceptable limits (ask your machine tech what these are) it will be time to replace the collet and/or the spindle on the machine in question.
Conclusion:
Regardless of what causes it, runout will erode your production efficiency. It will either creep up on you as your equipment wears or rear its ugly head suddenly. It’s best to be vigilant. Hopefully, you have gained a bit of knowledge about the characteristics of runout and increased your ability to troubleshoot on your own.